
How to Export a Kotlin IntelliJ IDEA Project to a JAR
- Coding Kotlin

- Jun 17, 2020
- 3 min read
Hey! Welcome to Coding Kotlin. Today we're going to be creating our first Kotlin project on IntelliJ IDEA and exporting it to a runnable JAR file. If you haven't already installed the Jetbrains IntelliJ IDEA IDE to your machine, I made a tutorial for how to do that here.
Open IntelliJ IDEA and it'll open up to the project menu. We want to create a new project, so click on the + Create New Project button as shown below:

Now you should be taken to the framework selection window. Here you can choose which frameworks you're using for your project. This is a Kotlin project, so go ahead and select Kotlin/JVM like this:

Hit the Next button to name our project. You can name your project whatever you want, but this is going to be a simple hello world project so we'll name our project HelloWorld. Once you've finished naming your project, setting the framework, and setting the project location, go ahead and click the Finish button and your project will be created and IntelliJ will load up.
Once IntelliJ opens, you'll see your project on the upper left corner. Right click on the src file and add a new file by going to New | Kotlin File/Class.

Go ahead and name your new file. Since we're making a hello world project, you can just name the file HelloWorld. Make sure that you select the file option and not the class. Once you've done that, you will see your brand new file under the src folder.
Go ahead and write the following code to your new file:
fun main() {
    print("Hello world!")
}
Once you've done that, head to File | Project Structure or press Ctrl + Alt + Shift + S. This brings up our project's project structure. On the left pane, select the Artifacts option. Then click the + button and select the JAR | From modules with dependencies... option. You should be here now:

This will open up yet another window allowing us to specify the main class that is the entry point to our program. We didn't specify a class, but IntelliJ made one for us automatically. Your class name will be projectKt where project is the file name you created. For us this will be HelloWorldKt. Make sure you have the capitalization correct and then press the OK button.

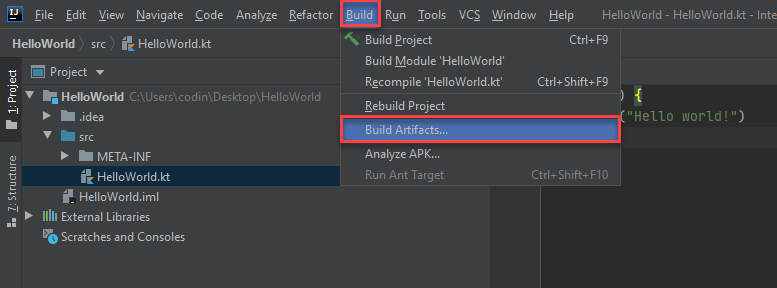
You just created your first artifact, so click OK in the Project Structure window to save it. Lastly, we need to build our artifact into a JAR file. Head to Build | Build Artifacts... and you'll see a little menu with your artifact and its build options. Click on the first option, Build, and wait for your project to build.
You've now successfully exported your project as a JAR! To run it, head to the terminal and go to the directory where the JAR file is in using the cd command. It should look something like this:
cd C:\Users\codin\Desktop\HelloWorld\out\artifacts\HelloWorld_jarOnce you're in the JAR directory, run it with the following command:
java -jar HelloWorld.jarAfter doing that, you'll see your program's output:

You've now successfully created your first Kotlin project and exported it as a JAR file. This file can be run on any computer that has Java installed on it. If you experienced any issues when going through this tutorial, please check out the video on YouTube. We post a video to go along with these posts each day. Check out the YouTube video here.
Tune in tomorrow for the next Kotlin tutorial!

Comments